

This tutorial was written by Monti on January 7th 2009. It's concept is copyrighted to Monti. Any creation you make from my ideas are yours. You may print out this tutorial for your own personal use, but please do not copy it in any way to put online, pass out or rewrite without my permission or worse yet attempt to claim as your own.
This was written for psp 9 but will work in other versions.
For this tutorial you will need
Paint Shop Pro
Animation Shop
My Supplies
Download HERE
Unzip and open in PSP.
Font of your Choice
I used Bradley Hand and Inspiration which are pay fonts so I am unable to supply.
Mask of your Choice
I used a mask by Becky (formerly Secrets of the Imagination)
Download HERE.
Unzip and place in your Masks folder.
Tube of your Choice
I am using the beautiful art of Jennifer Janesko used with a license from CILM.
You can purchase a license to use her work from www.cdoestore.com.
A Wood Pattern Fill of your Choice
You should have some with your psp but if you don't you can download some at the following links.
Plugins - Optional
Eye Candy 4000 - Gradient Glow
Eye Candy 5 - Nature Water Drops
Ok we are ready to start.
REMEMBER TO SAVE OFTEN
Step 1:
Open a new image 500 x 500 and flood fill with white.
Set your Foreground to Black and your Background to Null.
Activate your Preset Shapes tool set to Rectangle with Line Width: 30.
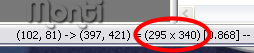
Draw out a Rectangle about 295 x 340 pixels.
NOTE:
If you look in the bottom right corner of your screen you should see some figures that move as you draw your rectangle. The one circled below gives you the size of your shape.
Go to Objects - Align - Center in Canvas and convert to Raster layer.
Activate your Freehand Selection (Lasso) Tool with the following settings
Feather and Tolerance: 0 - Point to Point: Selected - Antialias: Checked.
Zoom in slightly on your canvas and with your Lasso Tool select the top area making sure the corners are at an angle.
Then go to Selections - Float - Defloat.
It should look like the image below

Go to Selections - Modify - Expand - by 2 and add a new Raster Layer.
Set your Foreground to the Wood fill of your choice making sure that the grain goes Horizontally
(if your grain goes across leave the Angle as 0 - if it goes up and down change the Angle to 90)
Fill the selection on the new layer with the pattern.
Go to Selections - Float - Effects - 3D Effects - Cutout with the following settings
Vertical: 0
Horizontal: 0
Opacity: 100
Blur: 20
Colour: #6C4E20
Repeat cutout with the same settings but change the Blur to 10.
Deselect.
Go to Layers - Duplicate - then Image - Flip.
Use the mover tool to move the bottom frame into place using the black rectangle as a guide.
In the layer palette click on the eyes beside the 2 Horizontal frame layers to hide them for now.
Select your Freehand Selection (Lasso) Tool again with the same settings as before.
Click on the Black rectangle layer to activate it.
With your Lasso Tool select the left side area making sure the corners are at an angle.
Then go to Selections - Float - Defloat.
Go to Selections - Modify - Expand - by 2 and add a new Raster Layer.
Set your Foreground to the Wood fill of your choice making sure that the grain goes Vertically
(if your grain goes up and down set the Angle as 0 - if it goes across change the Angle to 90)
Fill the selection on the new layer with the pattern.
Go to Selections - Float - Effects - 3D Effects - Cutout with the following settings
Vertical: 0
Horizontal: 0
Opacity: 100
Blur: 20
Colour: #6C4E20
Repeat cutout with the same settings but change the Blur to 10.
Deselect.
Go to Layers - Duplicate - then Image - Mirror.
Use the mover tool to move the right side frame into place using the black rectangle as a guide.
Unhide all layers.
Once you are happy with your frame delete the black regtangle layer, hide the white background layer and Merge All Visible.
Rename Frame.
Unhide the White Background layer.
Now we are going to do the middle parts of the frame.
Set your Background to the Wood Pattern making sure the grain is Vertical and the Foreground to Null.
Activate your Preset Shapes Tool set to Rectangle and draw a thin rectangle about 12x340 pixels.
Go to Objects - Align - Center in Canvas and convert to Raster layer.
Go to Selections - Select All - Float - Effects - 3D Effects - Cutout with the following settings
Vertical: 0
Horizontal: 0
Opacity: 100
Blur: 10
Colour: #6C4E20
Deselect.
Move this layer down beneath the Frame layer in the layer palette.
Go to Layers - Duplicate - Image - Rotate - Free Rotate - Right - 90 - Rotate Single Layer Around Center Canvas.
Erase the parts that stick out past the main frame.
In the Layer Palette right click on the copy layer and choose Merge Down.
Step 2:
Select your Magic Wand - Tolerance and Feather: 0 and activate the Frame layer.
Click inside of it with the Magic Wand.
Go to Selections - Modify - Expand by 6.
Click on the white background to activate it and add a new Raster Layer.
Fill with a dark colour. I used #3A3A58
Do NOT Deselect.
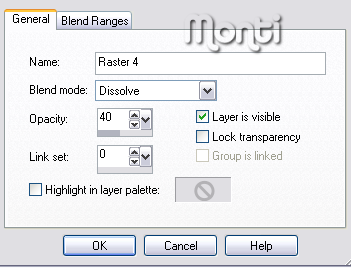
Add a new Raster Layer and fill with a lighter colour. I used #62638E.
In the layer palette right click on the lighter fill layer and choose Properties.
Change the Blend mode to Dissolve and the Opacity to 40.
Add a new Raster Layer and fill with black.
In the layer palette right click on the black fill layer and choose Properties.
Change the Blend mode to Dissolve and the Opacity to 5.
Do NOT Deselect.
Hide all layers apart from the 3 fill layers and Merge those Visible. Rename Fill.
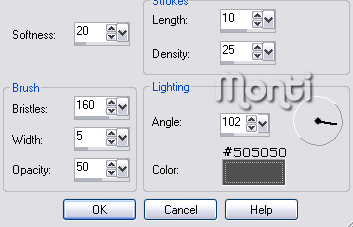
Go to Effects - Art Media Effects - Brush Strokes - with the following setings
Do NOT Deselect.
Unhide all layers.
Copy and paste your tube as a new layer above the Fill layer.
Resize if necessary making sure all layers is unchecked.
Go to Selections - Invert and hit delete on your keyboard.
Go to Selections - Invert again.
Add a new Raster Layer above your tube - rename Glass.
Set your Foreground to White and your Background to #C0C0C0.
Change your Foreground to Gradient with the following settings
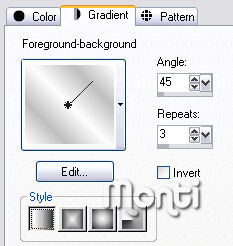
Fill the selection with the Gradient.
Lower the Opacity to 20.
Do NOT Deselect.
Step 3:
Add a new Raster Layer and rename Rain.
Go to Selections - Modify - Expand by 12.
Fill the selection with Black.
Go to Adjust - Add/Remove Noise - Add Noise with the following settings
Random: Checked - 30% - Monochrome: Checked
Then go to Adjust - Blur - Motion Blur with the following settings
Angle: 34 - Strength: 33
Change the blend mode to Screen.
Do NOT Deselect.
Add a new Raster Layer and rename Rain 1.
Fill the selection with Black.
Go to Adjust - Add/Remove Noise - Add Noise with the following settings
Random: Checked - 35% - Monochrome: Checked
Then go to Adjust - Blur - Motion Blur with the following settings
Angle: 34 - Strength: 34
Change the blend mode to Screen.
Do NOT Deselect.
Add a new Raster Layer and rename Rain 2.
Fill the selection with Black.
Go to Adjust - Add/Remove Noise - Add Noise with the following settings
Random: Checked - 40% - Monochrome: Checked
Then go to Adjust - Blur - Motion Blur with the following settings
Angle: 34 - Strength: 35
Change the blend mode to Screen.
Do NOT Deselect.
This next part is optional. I wanted to add a few static drops to my window so this is what I did.
Add a new Raster Layer and rename it Drops.
Go to Effects - Plugins - Eye Candy 5 - Nature - Water Drops.
Under settings choose Small, Perspiration, Light and apply.
Deselect.
Step 4:
Select the top layer (Frame) to activate it.
Select your Text Tool with a font of your choice. I used ITC Bradley Hand with the following settings
Foregound and Background: #2C2C4B - Size: 24 - Vector: Checked.
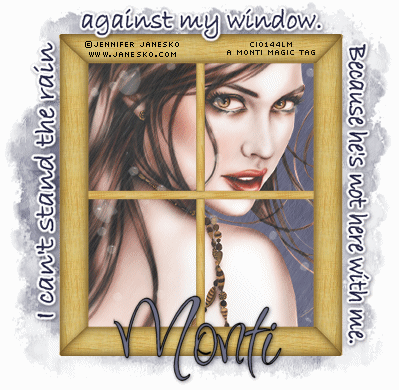
Type out the first part of your text - I used I can't stand the rain
Go to Image - Rotate - Free Rotate - Left - 90 - Rotate Single Layer Around Center Canvas.
Move into position at the left side and pull the nodes slightly if you want to stretch it to fit along the frame better.
Once you are happy convert to Raster Layer.
Go to Effects - Plugins - Eye Candy 4000 - Gradient Glow and apply with the following settings
Glow Width: 3 - Soft Corners: 40 - Overall Opacity: 100 - Draw Outside Selection: checked. Under Colour select Fat.
If you don't have this plugin you can use a White Drop Shadow.
Add the following Drop Shadow
Vertical: 1
Horizontal: 1
Opacity: 50
Blur: 6
Colour: Black
Select your Text Tool again with the same settings and type the center text. I used against my window,
Move into position at the top of the frame and go to Objects - Align - Horizontal In Canvas.
Once you are happy convert to Raster Layer.
Go to Effects - Plugins - Eye Candy 4000 - Gradient Glow and apply with the same settings we used above.
Add the same Drop Shadow.
Select your Text Tool again with the same settings and type the right text. I used Because he's not here with me.
Go to Image - Rotate - Free Rotate - Right - 90 - Rotate Single Layer Around Center Canvas.
Move into position at the right side and push the nodes slightly if you want to shorten it to fit along the frame better.
Once you are happy convert to Raster Layer.
Go to Effects - Plugins - Eye Candy 4000 - Gradient Glow and apply with the same settings we used above.
Add the same Drop Shadow.
Step 5:
Click on the White Background to activate it and add a new Raster Layer.
Fill with a dark colour from your fill layer and apply a mask of your choice and then Merge Group.
I used Becky_Mask022. It came down a little bit too far at the bottom for me so I used my Deform Tool to move the bottom up slightly.
Hide the White Background layer and activate your Crop Tool.
Click on Merged Opaque in the tool bar and then click on the tick.
Unhide the White Background.
If you want to resize your tag do it now making sure you use Bicubic and have All Layers Selected.
Activate the top layer and add a new Raster Layer. Add the artists copyright and any license number required.
Add your name using a font and colours of your choice.
I used Inspiration font - Size: 72 - Foreground: Black - Background: #6D6E85
Add the same Drop Shadow we used on our side text.
Hide this text layer for now.
Step 6:
In the layer palette hide Rain 1 and Rain 2 Layers.
Go to Edit - Copy Merged.
Open Animation Shop and go to Edit - Paste as New Image.
Back in PSP hide the Rain layer and unhide Rain 1.
Go to Edit - Copy Merged.
In Animation Shop go to Edit - Paste After Current Frame.
Back in PSP hide Rain 1 layer and unhide Rain 2.
Go to Edit - Copy Merged.
In Animation Shop Right click on Frame 2 and choose Paste After Current Frame.
If you want to save it like that you can.
Just go back to PSP unhide the Name layer - go to Edit - Copy and then in Animation Shop go to Edit - Paste as a New Animation.
Go to Edit - Copy.
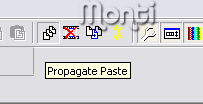
On your main tag go to Edit - Select All and then in the top tool bar click the Propagate Paste button.
Go to Edit - Paste Into Selected Frames.
Position and click the canvas to paste.
If you want to add my rain drops carry on doing the steps below.
Step 7:
Note: If you resized your tag in PSP remember to resize your Raindrops by the same amount.
In Animation Shop go to Edit - Select All - Edit - Copy.
Right click on Frame 3 and choose Paste After Current Frame.
Then Right click on Frame 6 and choose Paste After Current Frame.
You should now have 9 frames. Go to Edit - Select All.
In Animation Shop open Monti-LargeRainDrop.pspimage.
Go to Edit - Select All - Edit Copy.
Go back to your main canvas and make sure all Frames are still Selected.
Go to Edit - Paste Into Selected Frames.
Move your cursor to the top left window section and when you see the drop in about the same place I have it below, then left click your mouse to place it.

Still in Animation Shop open Monti-RainDrop.pspimage. You will notice this one only has 7 frames.
Go to Edit - Select All - Edit - Copy.
Then on your main canvas click on Frame 1 and hold down your Shift key and press on Frame 7.
You will see that Frames 1 - 7 are surrounded in blue to show they are selected.
Go to Edit - Paste Into Selected Frames.
Move your cursor to the bottom left window section and when you see the drop in about the same place I have it below, then left click your mouse to place it.
On the main canvas click on Frame 3 and hold down your Shift key and press on Frame 9.
Go to Edit - Paste Into Selected Frames.
Move your cursor to the top right window section and when you see the drop in about the same place I have it below, then left click your mouse to place it.
Still in Animation Shop open Monti-SmallRainDrop.pspimage. You will notice this one only has 5 frames.
Go to Edit - Select All - Edit - Copy.
Then on your main canvas click on Frame 5 and hold down your Shift key and press on Frame 9.
You will see that Frames 5 - 9 are surrounded in blue to show they are selected.
Go to Edit - Paste Into Selected Frames.
Move your cursor to the bottom right window section and when you see the drop in about the same place I have it below, then left click your mouse to place it.

Go back to PSP and unhide your Name layer. Go to Edit - Copy and then paste as a new image in Animation Shop.
Go to Edit - Copy.
On your main tag go to Edit - Select All and then in the top tool bar click the Propagate Paste button.
Go to Edit - Paste Into Selected Frames.
Position and click the canvas to paste.
Finally go to Animation - Frame Properties and change the Frame Properties to 20.
Save your finished tag.
No comments:
Post a Comment