


This was written for psp 9 but will work in other versions.
For this tutorial you will need
Paint Shop Pro
Scrap Kit
My Love Is Like A Butterfly Scrap kit which you can find HERE.
My Supplies
You can download them HERE.
NOTE: This Window PSP tube was made for this tut. DO NOT share it or use elsewhere without my permission.
A Font of your choice
I used International Palms which is a pay font so I can unable to supply it.
A Bow of your choice
A tube of your choice
I am using the wonderful art of Suzanne Woolcott.
Unfortunately Suzanne is no longer selling her work so please use an artist you have permission for.
Ok we are ready to start.
REMEMBER TO SAVE OFTEN
Step 1:
Open my mask and the tube of your choice in psp and minimize.
Open Monti-Window tube in psp, press Shift D to duplicate and close the original.
Click on the Blinds layer to activate and colourize to match your tube.
If you wish to use a different background for your window, resize it to 230 width by 120 height and paste it as a new layer under the Window Frame layer.
Merge all visible, rename Window and go to Increase Canvas size 500 x 500 pixels and use your mover tool to move it up a bit.
Add the following Drop Shadow
Vertical: 0
Horizontal: 0
Opacity: 40
Blur: 4
Colour: Black
Add a new raster layer, flood fill with white and send to the bottom.
Open the bow you have chosen. Colourize with the same settings you used for your blinds.
Resize as necessary and go to Adjust - Sharpen.
Copy and paste as a new layer onto your canvas and position on the window. See my tag for placement guide.
Duplicate and Mirror. Make sure the mirrored one is positioned properly.
Merge Down to merge the 2 Bows together. Rename Bows.
Add the following Drop Shadow
Vertical: 0
Horizontal: 2
Opacity: 30
Blur: 2
Colour: Black
Step 2:
Open the Monti-ButterflyLove-PinkHeart-Butterfly-Small.png. Press Shift D to duplicate and close the original.
Colourize with the same settings you used earlier.
Go to Image - Resize 50% - Smart Size - All layers CHECKED. Repeat Resize.
Copy and paste as a new layer onto your canvas and position on the window. Use your Deform tool to rotate the butterfly slightly. See my tag for placement guide.
Go to Adjust - Sharpen.
Rename that layer Butterfly and add the same Drop Shadow we used on the bows.
Open your tube of choice and copy and paste as a new layer onto your canvas. Rename Tube.
Resize as necessary. I resized mine by 80% Bicubic twice.
Add the following Drop Shadow
Vertical: 2
Horizontal: 5
Opacity: 40
Blur: 4
Colour: Black
Open the Monti-ButterflyLove-PinkHeart-Balloon.png. Press Shift D to duplicate and close the original.
Colourize with the same settings you used earlier.
Go to Image - Resize 50% - Smart Size - All layers CHECKED. Repeat Resize.
Go to Adjust - Sharpen.
I also adjusted the brightness on mine but that is optional.
Copy and paste as a new layer onto your canvas. Rename Balloon. I also mirrored mine but it depends what tube you use.
Use your mover tool to move into postition and move this layer beneath your tube layer.
Add the following Drop Shadow
Vertical: 0
Horizontal: 2
Opacity: 30
Blur: 2
Colour: Black
Step 3:
Open 2 of the papers from the Monti-LoveIsLikeAButterfly Scrap kit.
I used Monti-ButterflyLove-PinkHearts.jpg and Monti-ButterflyLove-PinkDots.jpg.
Colourize with the same settings you used earlier and minimize.
Set your foreground to a dark colour from your tube and your background to pattern. I used Monti-ButterflyLove-PinkDots.jpg - Angle: 0 - Scale: 50.
Select your Preset Shapes - Rectangle with the following settings.
Create as Vector - Checked
Horizontal Radius - 15
Vertical Radius - 6
Line Style - Solid
Width - 1
Draw out a Rectangle approximately 220 x 70 and convert to Raster layer.
Go to Selections - Select All - Float. Selectons - Modify - Contract by 6.
Add a new Raster layer and fill with your foreground colour.
Go to Selections - Modify - Contract by 1 and flood fill with white.
Change your foreground to pattern, I used Monti-ButterflyLove-PinkHearts.jpg - Angle: 0 - Scale: 50.
Add a new Raster layer and fill with the pattern. Lower the Opacity to 46% and Deselect.
Hide all layers apart from the top two we just created and Merge Visible. Rename Nameplate.
Add the following Drop Shadow
Vertical: 0
Horizontal: 0
Opacity: 40
Blur: 4
Colour: Black
Open one of the Heart Flowers from my kit. I used Monti-ButterflyLove-HeartFlower3.png.
Press Shift D to duplicate and close the original.
Colourize with the same settings you used earlier.
Go to Image - Resize 50% - Smart Size - All layers CHECKED. Repeat Resize twice for a total of 3 times.
Go to Adjust - Sharpen.
Copy and paste this as a new layer on your canvas and position in the top left corner of the Nameplate.
Add the following Drop Shadow
Vertical:2
Horizontal: 2
Opacity: 30
Blur: 2
Colour: Black
Duplicate this layer and move it to the bottom right corner of the Nameplate. On the layer palette right click on the top layer (copy of raster 2) and choose Merge Down.
Right click on the top layer (raster 2) and merge down.
Your layer palette should now look like this:
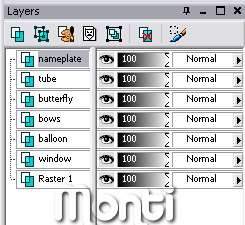
Move your Nameplate into position on your canvas and then move your tube layer up to the top.
Step 4:
Click on the white background layer to activate it and add a new Raster layer.
Set your foreground to a very light colour from your tube and activate your Airbrush tool with the settings shown below.
Lightly spray some colour on the canvas.
Go to Adjust - Blur - Guassian Blur - Radius 20.
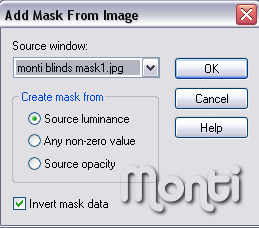
Go to Layers - New Mask Layer from Image. Find the Monti Blinds mask1.jpg that you minimized at the start of the tutorial and apply with the following settings.
Go to Layers - Merge Group and lower the Opacity of the Mask layer to 44.
Hide the white background layer and crop image to size.
With your foreground and backgound set to a dark colour from your tube add your name using a font of your choice.
I used International Palms at size 48.
Add the following Drop Shadow
Vertical: 2
Horizontal: 2
Opacity: 30
Blur: 2
Colour: Black
Add the artists copyright and save.

No comments:
Post a Comment