

This tutorial was written by Monti on October 1st 2006 and reworked on 11th October 2014. It's concept is copyrighted to Monti. Any creation you make from my ideas are yours. You may print out this tutorial for your own personal use, but please do not copy it in any way to put online, pass out or rewrite without my permission or worse yet attempt to claim as your own.
This was written for psp 9 but will work in other versions.
For this tutorial you will need:
Paint Shop Pro
Animation Shop
Alien Skin Xenofex 2
If you don't have this you can use DSB Flux to create a glitter effect.
My supplies.
Download Here
This includes the Star Brushes. Unzip and put them in your Brush folder inside "My PSP Files" folder. If they fail to show open the png file in PSP and go to File - Export - Custom Brush.
My Inner Bevel- Glass Text. Unzip and put in your Presets folder in "My PSP Files"
My Eye Candy 5 Glass Preset. Place my Monti-GlassText setting into your Eye Candy 5 - Impact - Settings - Glass folder.
My Eye Candy 5 Glow Preset. Place my Monti-FairyDust setting into your Eye Candy 5 - Impact - Settings - Glow folder.
Eye Candy 5 - Impact
Glass and Gradient glow
Mask of your choice
I used gemsmasks-105 available from http://gemstagginscraps.blogspot.co.uk/search/label/Masks
Fairy Dust Font
Or a font of your choice.
A Tube of your choice.
I am using the art of Joel Adams used with a license from CDO..
You can purchase a license to use his work from www.cdoestore.com.
Ok we are ready to start.
REMEMBER TO SAVE OFTEN
Step 1:
Open a new image 600 x 600 transparent image and flood fill with white.
Copy and paste your tube as a new layer, resize by 90% making sure All Layers is Unchecked. Repeat Resize.
Move your faerie towards the top of the canvas leaving about 50 pixels room at the top.
Duplicate and activate the original faerie layer.
Go to Adjust - Gaussian blur - Radius: 20 and then colourize to match your tube.
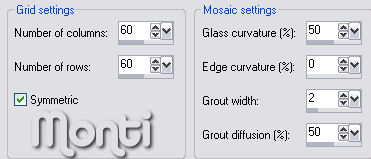
Go to Effects - Texture - Mosiac Glass with the settings shown below.
Resize this layer by 90%
Activate the duplicate faerie layer and apply the following Drop Shadow
Vertical: 4
Horizontal: 4
Opacity: 35
Blur: 4
Colour: Black
Step 2:
Activate your bottom white layer and add a new Raster layer.
Flood fill with a light colour from your tube. Apply a Mask of your choice or the one I used. Merge Group and resize 90%.
Activate your top layer and select your text tool. Font Fairydust - size 72 - Foreground set to a dark colour from your tube - Background set to a medium or light colour from your tube - stroke 1 - Bold and Vector selected and type your name.
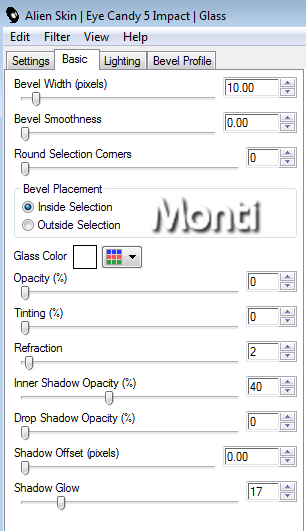
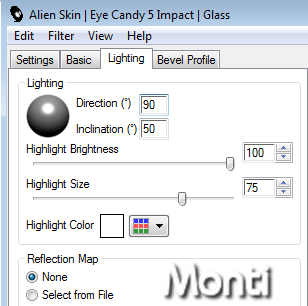
Apply the Glass Text Inner Bevel then apply Eye Candy 5 - Impact - Glass - Monti-Glass Text setting.
Add the same Drop Shadow we used earlier.
Step 3:
Add a new Raster layer (make sure this is the top layer) and set your Foreground to a medium to dark colour from your tube.
Click on your brush tool and apply the Monti Stars - size 100. Click 10 times (without moving your brush) just by her hand.
Apply the Eye Candy 5 - Impact -Glow -Monti-FairyDust preset but change the 1st colour to a dark one to match your tube.
Hide your white background layer and crop - Merged Opaque. Unhide the white background layer.
If you want to resize it do so now.
Add a new Raster layer and add the artists copyright and your watermark.
Lower the opacity on the name layer to 0 and then open Animation Shop.
Step 4:
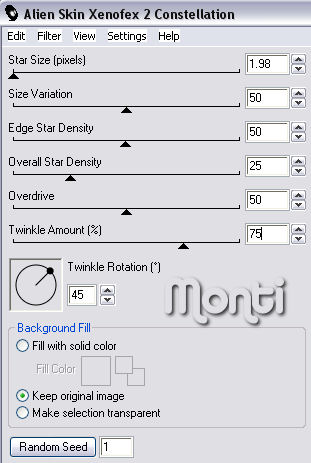
Activate your Stars layer and apply Xenofex 2 Constellation with the following settings. (If you don't have Xenofex 2 you can use DSB Flux, Intensity 30. I have included settings below).
Copy merged and paste in Animation Shop.
Back in PSP go to Edit - undo Constellation.
Use your mover tool to move the stars down slightly.
Apply Xenofex 2 Constellation but click random seed once. (DSB Flux users click mix twice).
Copy merged and paste after current frame in Animation Shop
Back in PSP go to Edit - undo Constellation.
Use your mover tool to move the stars down slightly.
Apply Xenofex 2 Constellation but click random seed once. (DSB Flux users click mix 3 times).
Copy merged and paste after current frame in Animation Shop.
Back in PSP go to Edit- undo Constellation.
Use your mover tool to move the stars down slightly.
Apply Xenofex 2 Constellation but click random seed once. (DSB Flux users click mix 4 times).
Copy merged and paste after current frame in Animation Shop.
Back in PSP go to Edit - undo Constellation.
Set the opacity on your text layer to 20.
Activate your Stars layer and apply Xenofex 2 Constellation but click random seed once. (DSB Flux users click mix once).
Copy merged and paste after current frame in Animation Shop.
Back in PSP go to Edit - undo Constellation.
Set the opacity on your text layer to 40.
Activate your Stars layer and apply Xenofex 2 Constellation but click random seed once. (DSB Flux users click mix twice).
Copy merged and paste after current frame in Animation Shop.
Back in PSP go to Edit - undo Constellation.
Set the opacity on your text layer to 60.
Activate your Stars layer and apply Xenofex 2 Constellation but click random seed once. (DSB Flux users click mix 3 times).
Copy merged and paste after current frame in Animation Shop.
Back in PSP go to Edit - undo Constellation.
Set the opacity on your text layer to 80.
Activate your Starslayer and apply Xenofex 2 Constellation but click random seed once. (DSB Flux users click mix 4 times).
Copy merged and paste after current frame in Animation Shop.
Back in PSP go to Edit - undo Constellation.
Set the opacity on your text layer to 100.
Activate your Stars and Sparkles layer and apply Xenofex 2 Constellation but click random seed once. (DSB Flux users click mix once).
Copy merged and paste after current frame in Animation Shop.
Back in PSP go to Edit - undo constellation.
Leave the opacity on your text layer at 100.
Activate your Stars and Sparkles layer and apply Xenofex 2 Constellation but click random seed once. (DSB Flux users click mix twice).
Copy merged and paste after current frame in Animation Shop.
Back in PSP go to Edit - undo Constellation.
Leave the opacity on your text layer at 100.
Activate your Stars and Sparkles layer and apply Xenofex 2 Constellation but click random seed once. (DSB Flux users click mix 3 times).
Phew aren't you glad that bits over with lol.
Step 4:
In Animation Shop hold down the shift key and click on frames 8, 9 and 10 to select them.
Go to Edit - Copy. Click on Frame 10 to activate it, right click and choose Paste after Current Frame.
You should now have a total of 13 frames.
Edit - Select All and change the Frame Properties to 25.
Hold down the shift key and click on frames 8, 9, 10, 11, 12 and 13 and set Frame Properties to 50.
Save.
No comments:
Post a Comment