


This tutorial was written by Monti on October 28th 2005 and reworked on 9th October 2014. It's concept is copyrighted to Monti. Any creation you make from my ideas are yours. You may print out this tutorial for your own personal use, but please do not copy it in any way to put online, pass out or rewrite without my permission or worse yet attempt to claim as your own.
This was written for psp 9 but will work in other versions.
For this tutorial you will need:
Paint Shop Pro
Animation Shop
Brushes or a mask of your choice
2 Fonts of your choice.
One thick one, I am using Bon Jovi
One Script font of your choice.
I am using Ambiance BT which is a pay font but any nice script font will work.
My Zip File
Click on the link below to download.
Import the brushes into PSP and open the Tear tubes in PSP.
A Tube of your choice.
I am using the wonderful art of Zindy Nielsen used with a license. You can find her work at http://zindy-zone.dk/
Please only use an artist you have permission for.
Ok we are ready to start.
REMEMBER TO SAVE OFTEN
Step 1:
Open a new image 300 x 460 and flood fill with black.
Open your main tube. Copy and paste as a new layer onto your image. Resize if neccessary.
Go to Adjust - Hue and Saturation and set both to 0.
Duplicate your tube layer.
On the original go to Adjust - Blur - Gaussian Blur - Radius 3
On the top tube layer change the blend mode to Screen or Soft Light, which ever suits your tube better. I used Soft Light on mine.
Add a new layer and move it below both tube layers.
Here you can either set your foreground to white and apply different brushes on that layer and lower the opacity until you are happy with the colouring, or you can fill with white and apply a mask of your choice. Merge group and again you can lower the opacity until you are happy with it.
Step 2:
Go to Image - Add Borders with the following settings
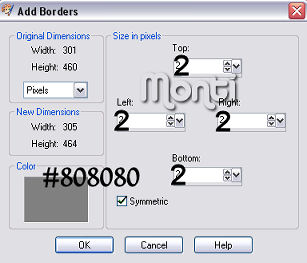
Repeat with the settings shown in the screen shot above.
Click on the black border with your magic wand with the following settings.
Set your Foreground to #808080 and your Background to #DDDAE2.
On your foreground select gradient and choose Foreground-Background - Linear - Angle: 45 - Repeat: 1
On your main image add a new raster layer and fill the selected area with the gradient.
Lower the opacity to 30 and deselect. Merge all visible.
Step 3:
Go to image canvas size and use the following settings. 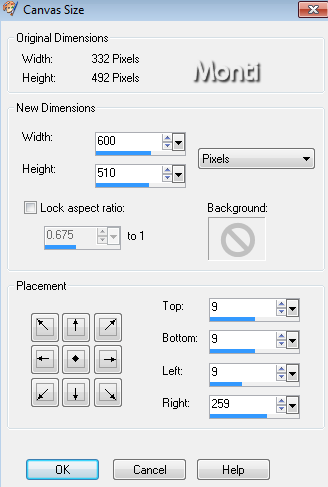
Go to Image - Add Borders with the same settings used in step 2.
Step 4:
Add a new raster layer.
Set your foreground to #DDDAE2 and select MCOverYou brush Size 250 and
apply it over the tube part of your image.
Add the following drop shadow.
Vertical = 1
Horizontal = 1
Opacity = 79
Blur = 1
Colour = black.
Add a new raster layer and apply MCBrokenLove brush size 365 and lower the opacity to 60.
Step 5:
Find a thick font of your choice - I used Bon Jovi
With your foreground and background set to white and Vector checked - size 30 (if you are using a different font make sure you use all capital letters) type out your name and use the nodes to fit it into the area. Use my tag as an example.
When you are happy with the positioning convert to raster layer and reduce opacity to 20.
Change your font to Ambience (or another scripty font of your choice) and change your font size to 72 (or whatever suits your font).
Again use your nodes to stretch and pull it to the right size.
Convert to raster layer and apply the following drop shadow.
Vertical = 1
Horizontal = 1
Opacity = 79
Blur = 1
Colour = black.
If you want to resize it, do it now before adding the credits.
Add the artists copyright.
NOTE: If you want to save a blank template for adding names to later then hide the 2 name layers before you continue.
Open animation shop.
In psp go to Edit Copy and paste it as a new animation in Animation Shop.
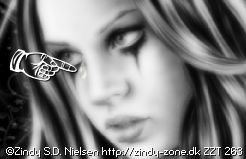
Back in PSP copy and paste your Left Tear tube as a new layer on the image. Resize if neccessary to fit your tube.
Make sure the opacity is set to 76.
Use your mover tool to position it just in the corner of her eye.
See example below.
Go to Edit Copy Merged and go back to Animation Shop.
Right click on the first frame you have in there and choose Paste after Current image.
Back in psp zoom in on your image and move the Left Tear down slightly.
Copy and paste your Right Tear as a new layer and position just under the other eye.
Make sure the opacity is set to 76
See example.

Go to Edit Copy Merged and go back to Animation Shop.
Right click on the 2nd frame you have in there and choose Paste after Current image.
Back in PSP zoom in on your image and move the Left Tear down slightly.
Move your Right Tear down slightly.
See example.

Go to Edit Copy Merged and go back to Animation Shop.
Right click on the 3rd frame you have in there and choose Paste after Current image.
Back in PSP zoom in on your image and click on your Left Tear to activate it.
Resize it by 50%. Move the Left Tear down slightly
Move your Right Tear down slightly and slightly to your right.
See example.

Go to Edit Copy Merged and go back to AS .
Right click on the 4th frame you have in there and choose Paste after Current image.
Step 7:
Go to Edit - Select all.
Right click on one of the frames and choose Frame Properties.
Set to 56 and click ok.
Click on the first frame to activate it.
Right click and set the frame properties for that frame only to 100.
Save as a blank tag for adding names to later, or unhide your name layer in PSP and hide all other layers. Copy merged and paste in animation shop.
On your animated tag go to Edit - Select All.
On the top tool bar click on Propagate Paste.
Copy your name and paste into selected frames.
Save your tag.
This comment has been removed by a blog administrator.
ReplyDelete